Sunday, September 30, 2012

30 days of pinterest: day 30!

DING DONG THE WITCH IS DEAD

Pretty much anyone who knows me at all knows that I LOVE HALLOWEEN. I am a decorate-the-house-from-top-to-bottom kind of fanatic. I love to hunt for new ideas each year to add to my decoration collection. Since it's almost October, (I make myself way until the 1st to start pulling things out) I thought this was the perfect addition to my decor and the perfect way to end my 30 days of pinterest.

The credit:
http://www.halloweenforum.com/halloween-props/115679-homemade-crashed-witch-prop.html


The process:
I slipped the two pool noodles into the stripped tights and put the shoes on.

The change:
No real changes except for the display technique.

The checkbook:
I already owned the tights and shoes and spent $2 on the pool noodles at the Dollar Tree

The bottom line:
This is a spooktacular idea. The noodles make the legs look incredibly skinny. I think the more expensive versions are a little fatter but pool noodles are hard to come by in September.


Saturday, September 29, 2012

30 days of pinterest: day 29

I DID IT MY WAY SCARF

The credit:
http://www.comeonilene.com/2011/10/17/american-apparel-circle-scarf-knock-off-tutorial/


The process:
I found some fabric I liked at Wal-Mart and decided to go ahead and get it even though it wasn't 100% knit. It had a little stretch to it and I liked the pattern. I thought I would be sewing the fabric in half so I didn't think that it would matter that the pattern was only on one side of the fabric. This was my first mistake...assuming that I knew what the directions were going to have me do. They did not in fact have me sewing the fabric in half, (well, at least not in the direction I expected to) so when I sewed the way the blogger said to, you could see a lot of the unprinted side of my fabric. I decided to take it from here and ventured out on a long journey of sew, cut, think, redo. I can't even begin to describe the steps I took to complete my scarf but let's just say I'm glad the kids were gone because I couldn't put it down until I figured it out, 2 hours later!

The change:
Too many to count.

The checkbook:
$8 for fabric at Wal-Mart for 2 scarves.

The bottom line:
This is a it would have been so simple if I'd bought the right fabric idea. I still love what I ended up with but next time will take the time to get the knit fabric suggested.

Where is Jon when I need a self-picture?!?!

Friday, September 28, 2012

30 days of pinterest: day 28

HANGING AROUND

I needed something for our dining room and thought this would be perfect.

The credit:
http://dittledattle.blogspot.com/2010/09/halloween-sign-free-download.html


The process:
I took various sizes of canvas painted the edges and modge podged scrapbook paper to them (1 layer to glue the paper on and then 2 layers on top of the paper). Then I used cardstock to cut out the letters and glued them to the canvas using a glue stick. I taped ribbon to the back of each canvas to hang them on the rod making sure that the bottom of all the canvases lined up. The previous owner left some brackets on the wall so I tried to use them to hang the rod. Like the original blogger, I found that the canvas looked really funny hanging that far out from the wall. I took the brackets down and used robe hooks instead to hold the rod up.

The change:
Instead of old pieces of moulding like the original blogger used, I opted for canvas. It was lighter and I didn't have to mess with cutting a bunch of wood.

The checkbook:
This project got kind of pricey. I spent $40 on the canvas, paper, ribbon and hardware to hang the rod.

The bottom line:
This is a looks expensive but it's not idea (if you don't consider $40 expensive.) It looks a little off with ours hanging so high but I have a new buffet/sideboard on my furniture wish list which will go right under this and make it look way better.


Thursday, September 27, 2012

30 days of pinterest: day 27

TO DYE FOR

The credit:
http://sewlikemymom.com/fabric-designing/
and
http://pinaforesandpinwheels.blogspot.com/


The process:
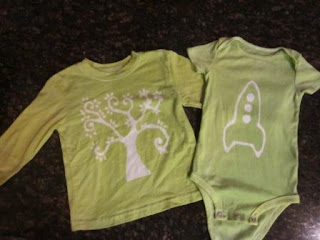
I used Elmers white glue and "drew" the designs directly on the shirts. (I printed them off and put them under the shirts so I could trace them.) Be sure to put something non-absorbent inside the shirt so the glue doesn't go all the way through. I used a small cutting board. I tried lettering on Landon's shirt and found the glue a little difficult to control. All the letters were blending together so I wiped off the glue and tried something else. I let the glue dry for about 30 hours then dyed them with a package of lime dye I found in the craft section at Wal-Mart. I like this stuff way better than the normal RIT dye.) The shirts stayed in the dye for about 10 minutes then I pulled them out, rinsed them in cold water, scrapped off the glue with a butter knife (it's all slimy but comes right off with the knife) and then threw them in the washer for a warm wash. I dried them in the drying using the air setting for about an hour then hung them to dry the rest of the way.

The change:
No changes.

The checkbook:
The dye was $3 and I went ahead and spent .50 for a new bottle of glue.

The bottom line:
This is a cross your fingers and hope it turns out idea. If I do it again, I would try to get the glue into something with a smaller tip like an old puff paint bottle so I could do some lettering/more detailed designs.


Wednesday, September 26, 2012

30 days of pinterest: day 26

PRETZEL BITES

Who doesn't love a warm, salty pretzel? When I worked at the mall in Lubbock the office was next to the pretzel shop, and once a month or so they would bring us all a treat and I remember looking forward to that sweet/salty smell making its way down our hall. Yummmm....
The credit:
http://www.justgetoffyourbuttandbake.com/?p=932


The process:
I followed the directions exactly minus the change in rolls listed below.

The change:
Our grocery stores don't carry a wide variety of Rhodes products so I had to use the regular Rhodes dinner rolls instead of the Texas Sized ones the original blogger referred to.
The checkbook:
$4 for the rolls at Wal-Mart.

The bottom line:
I was a little sceptical about these once I got into the process. How were they not going to taste just like rolls. Well, somewhere between the baking, buttering, salting these homely rolls became something really delicious. I tried all 3 varieties (plain Kosher salt; Kosher salt, parmesan and garlic; cinnamon/sugar). Each one turned out sooo good. It's all about the Kosher salt. But in the end, the cinnamon/sugar ones took top award. This is a who would have thought idea and one definitely worth trying. You have to devote a few hours to this project to allow for all the thawing and raising but you will be rewarded in the end.


Tuesday, September 25, 2012

30 days of pinterest: day 25

DO YOU KNOW THE MUFFIN MAN

I am always down for new recipes with only 3 ingredients, 2 of which are chocolate!

The credit:
http://nomadicnomnom.wordpress.com/2012/06/04/1-point-weight-watcher-cupcakes/


The process:
I followed the directions exactly making some regular-sized and some mini-sized muffins. The batter is very sticky and a little difficult to get into the cupcake liners. I did as the blogger said and filled the cupcakes up to the very top.

The change:
No changes

The checkbook:
$8 on the 3 ingredients

The bottom line:
This is a raid your pantry idea. You could very well find each of these ingredients on your shelf which makes it a nice alternative to recipes that require butter and eggs. They tasted great and definitely satisfied my sweet tooth.


Monday, September 24, 2012

30 days of pinterest: day 24

THE SHIRT OFF MY BACK

I have 3 pins in process so it's now after 9 pm and I am rushing around to actually complete one today. Thanks to my mom and a trip to the Dollar Tree, I am stocked with t-shirts that I can chop, sew and manipulate in whatever way I choose. Perfect for this pin...

The credit:
http://psimadethis.com/post/660172583/we-are-all-giddy-and-ruffling-our-feathers-to-kick


The process:
The instructions were pretty simple. I thought about using my machine to do the stitching but decided to hand stitch like the directions said. My ruffle didn't quite turn out the same. I think if I would have sewed lower on the ruffle it would have been a closer match to the original.

The change:
No changes

The checkbook:
I used one of my newly acquired $1 t-shirts.

The bottom line:
This is a whip it out in 20 minutes or less kind of idea (thank goodness, cause now it's close to 10 pm!). I am not big on wearing things that require a special bra (TMI) but this ditty is cute enough that I might go to the extra effort. For long-term use, I would probably opt to use my machine to stitch the ruffle in place.


Sunday, September 23, 2012

30 days of pinterest: day 23

HAIR DO

I am always on the look out for hair straps to keep my unruly hair out of my face and this one looked like a good one to try.

The credit:
http://www.tripoverjoy.com/2010/10/diy-accessories-from-t-shirt.html


The process:
Before I discovered Pinterest, I gave away gobs of old clothes and now find myself having to buy t-shirts and sweaters to do all my crafts. Go figure! I had some extra jersey fabric and decided to use it instead of trying to hunt down a t-shirt worth shredding. I followed the instructions and in less than 5 minutes had myself a spiffy new hair strap. I didn't quite understand how to tie off the ends. The first time I tried a basic square knot and cut off the ends, it came undone when I stretched the band really far. On my second attempt, I left the strands after tying the knot just in case it decided to slip.
The change:
If you count using the jersey fabric instead of an old t-shirt a change, than that's the only change that I made.

The checkbook:
Another $0 project.

The bottom line:
I like this upcycle/recycle idea and will keep an eye out for old t-shirts to make some more.

Saturday, September 22, 2012

30 days of pinterest: day 22

DEEP BREATH

I love the smell of Vicks vapor chest rub. If these things could make my entire shower into a Vicks steam capsule, count me in.

The credit:
http://beingfrugalbychoice.blogspot.com/2012/03/homemade-vicks-vapor-shower-disks.html


The process:
The author offered two methods to make the shower disks. I opted for the baked version since I was making them at my moms house. I used 1 cup of baking soda and a little more than 1/3 cup of water. I lined 6 cupcakes and filled each one equally. I baked them at 350 degrees for 20 minutes.

The change:
Instead of essential oils, I added several drops of some Vicks menthol medication you add to humidifiers. The pucks soaked it up so I thought it would be ok. Maybe not...

The checkbook:
All supplies on hand except for the cupcake liners which I snagged from mom free of charge. $0

The bottom line:
I'm not really sure where I went wrong with these. Could have been something in the measuring, baking, vapor oil stuff or the fact I stored them in a ziplock bag overnight. Whatever I did, this pin did not work for me. The disks were wet and fell apart completely. I like this potentially possible idea but probably won't take the time to try it again.


Friday, September 21, 2012

30 days of pinterest: day 21

BRING ON THE BURRRR

The credit:
http://deliacreates.blogspot.com/2011/11/ear-warmerssimplified-tutorial.html


The process:
I made a pattern according to the original bloggers measurements and cut out a piece of navy fleece. My sewing machine has been on the fritz so I used my moms to stitch around the edges. I hand stitched on a button and cut a small hole directly in the fleece for the button hole. I made a large bow out of grey fleece and hand stitched it onto the ear warmer.

The change:
No changes.

The checkbook:
All materials already on hand $0

The bottom line:
This is an everyone is getting one of these for Christmas ideas. I am going to perfect my pattern (it was a little long since fleece has lots of natural stretch) and I think it's a tad on the wide side (or maybe I have a small head). I can't wait to play around with colors and embellishments. LOVE IT!


Thursday, September 20, 2012

30 days of pinterest: day 20

CRAFT TABLE

So I obviously did not complete this pin today. It took me several days but it's finally finished and ready to show off.

The credit:
The original blog link was disabled.


The process:
I bought a set a book shelves from Target that ended up being way too tall. I had better luck with a set from Wal-Mart. After assembling the shelves, I prepped and painted the door and then used several screws to attach it to the book shelves.

The change:
I used an old door for the top.

The check book:
The book shelves were $16 a piece and the door was free. I spent way too much on paint with 2 quarts costing me $20.
     Total: < $40

The bottom line:
I love this dual-purpose idea. I now have a great workspace as well as tons of storage. The fabric storage boards from day 8 fit perfectly in the shelves.


Wednesday, September 19, 2012

30 days of pinterest: day 19

LET'S GO LEGOS

I LOVED playing with legos when I was a kid. I know there will come a day when Presley & Landon will spend hours playing with them so why not go ahead and make one of these. Of course, I will probably need to make a second one in the future to avoid major fights.

The credit:
http://thatsmyletter.blogspot.com/2012/06/l-is-for-lego-tray-2.html


The process:
I didn't want to spend a lot of money on this project so I tried to utilize what I had on hand modifying the original design as needed. My dad was a BIG help with this one and even got to try out his new pocket hole tool.

The change:
Per my statement above, I used 3/4 plywood. The grey lego base board was 3 times the price of the green and blue pieces so I just left it out. I wish I would have had the base boards in my possession before building the tray because I would have tried to modify my wood measurements to fit the lego base boards so I wouldn't have had to do so much cutting on the lego base boards. Also the 3/4 plywood is a little on the heavy side. That's probably why the original design called for 1/2 plywood.

The checkbook:
After scrounging up all the wood, screws, and handles I was only out $13 for the lego base boards.

The bottom line:
This is a practical idea and one that I hope my kids will utilize for years to come.


Tuesday, September 18, 2012

30 days of pinterest: day 18

THAT'S A WRAP

The credit:
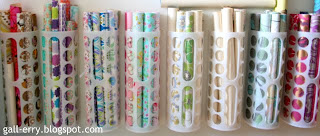
http://gall-erry.blogspot.com/2011/11/origamibollar.html


The process:
My mother-in-law made a trip to IKEA recently so I asked her to pick me up a few of these.
The change:
No changes.
The checkbook:
I bought 3 at $1.99 each.
     Total: $6
The bottom line:
What a cleaver idea. I used to keep my wrapping paper in an under-the-bed box and was constantly digging through it to find the paper I wanted. Now I can see it all and grab exactly what I need.

Monday, September 17, 2012

30 days of pinterest: Day 17

THE WRITE STUFF

I saw this and wanted to see if it really worked.

The credit:
http://tools.atozteacherstuff.com/printable-handwriting-practice-worksheet-maker/


The process:
Easy, step-by-step instructions guide you through the process of creating one-of-a-kind worksheets.

The change:
No changes

The checkbook:
Just a little printer ink.

The bottom line:
This is a smart idea and it will be fun to have them available to help Presley learn to write her name.


Sunday, September 16, 2012

30 days of pinterest: day 16

SEWING MACHINE PIN CUSHION

Some people (my mom and mother-in-law) can probably sew without using straight pins but I have to have them. The trouble with using them is they always seem to be everywhere! I have magnetic pin cushions, wrist pin cushions, tomato pin cushions, ok, I think that's all I have. Anyway, I saw this post and immediately had to add it to my cushion collection.

The credit:
http://icanfindthetime.blogspot.com/2010/07/sewing-machine-pin-cushion.html


The process:
As every sewing machine is different, I was on my own when it came to the size to cut my fabric. My first attempt resulted in a cushion that was way too tall. I cut it down and ended up with the perfect size for my machine.

The change:
No changes.

The checkbook:
All supplies on hand. $0

The bottom line:
This is a you're going to use it idea. I can't wait to be sewing along with my trusty sewing machine pin cushion by my side.


Saturday, September 15, 2012

30 days of pinterest: day 15

AHHHH CHOOOOO

My sewing machine has been acting up lately so I needed a really simple project to ease it back into action. It's one of those rainy Saturdays that makes me feel all cozy inside the house. Cozy makes me think of winter and winter makes me think of colds. Don't you feel enlightened now that you can follow the road that lead me today's pin?!

The credit:
http://www.marthastewart.com/269869/tissue-cases?center=0&gallery=274503&slide=269869


The process:
The directions were really easy and my sewing machine performed beautifully.

The change:
No changes.

The checkbook:
I already had all the supplies required so another $0 project.

The bottom line:
This is a add some frill to something mundane idea. It took me all of 3 minutes to make and will hopefully hold up to all the packages of tissues I imagine myself using during the upcoming cold & flu season. Happy sneezing to all!


Friday, September 14, 2012

30 days of pinterest: day 14

COOKIE DOUGH BITES

Who wouldn't want to try to make these?!?!

The credit:
http://family.go.com/food/recipe-639377-cookie-dough-bites-t/#memberViews


The process:
I followed the recipe exactly except for the small change mentioned below.

The change:
I already had normal size milk chocolate chips on hand so used those instead of buying mini chocolate chips.

The checkbook:
I had to buy the salted butter but everything else was pantry staples.

The bottom line:
Holy moly this was a sweet tooth inspired idea. These things tasted just like you were eating raw cookie dough. They are super rich and one at a time is definitely enough. Now what to do with the remaining 24...